Quick Start Guide
If you are interested in exploring template databases but do not want to install or run any tools, download a zipped example preset template here: LOCOS Example Template. After download, unzip the file geodatabase and follow the steps below to take a guided look through the database.
Note
The database contains domains, data sources, and a description of map units that serve only as an example. They do not represent actual data.
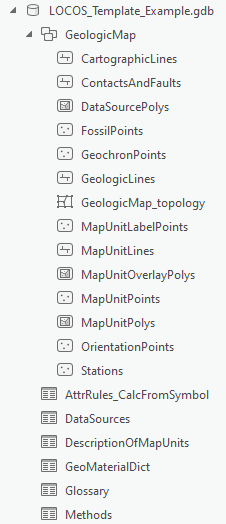
Tour The Example Database
In the Catalog Pane or Catalog View, expand the database and GeologicMap feature dataset to see everything included in the database. Note the following:
- The included topology class
- Various GeMS optional feature classes
- Non-GeMS additions including the AttrRules_CalcFromSymbol and Methods non-spatial tables
Domains
Right-click on the LOCOS_Template_Example.gdb database and click on . Some domains are supplied by GeMS while others are supplied by the template.
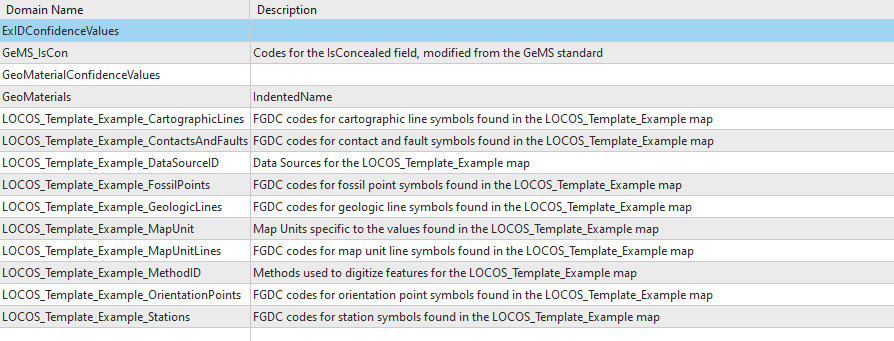
- GeMS_IsCon
- LOCOS_Template_Example_CartographicLines
- LOCOS_Template_Example_ContactsAndFaults
- LOCOS_Template_Example_DataSourceID
- LOCOS_Template_Example_FossilPoints
- LOCOS_Template_Example_GeologicLines
- LOCOS_Template_Example_MapUnit
- LOCOS_Template_Example_MapUnitLines
- LOCOS_Template_Example_MethodID
- LOCOS_Template_Example_OrientationPoints
- LOCOS_Template_Example_Stations
- ExIDConfidenceValues
- GeoMaterialConfidenceValues
- GeoMaterials
Refer to each tab below to see how various LOCOS_Template_Example domains are formatted in the database. You can access the domains within the database to see more examples and values.
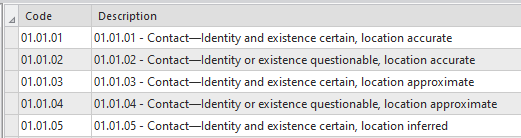
- Codes are zero-padded FGDC symbol codes.
- Descriptions are formatted as
FGDCCode - FGDCDescriptionand follow the FGDC.stylx file symbol descriptions.
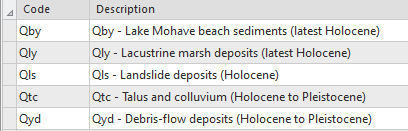
- Codes are typical MapUnit codes.
- Descriptions are formatted as
MapUnitCode - FullName (Age)and use information from the database's DMU.
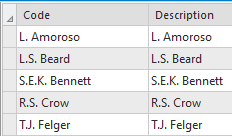
- Codes use a citation abbrevation format and correspond to DataSources_ID in DataSources.
- Descriptions match the codes.
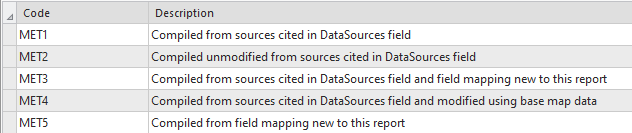
- Codes use MET followed by a sequential number such as MET1, MET2, MET3, etc.
- Descriptions state the method type in plain text.
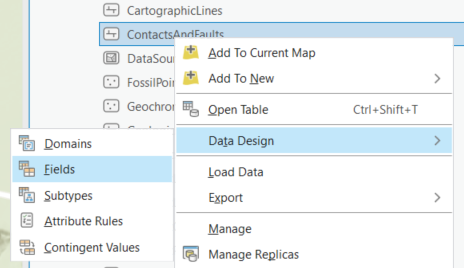
Refer to each tab below to see how the domains are assigned to fields in example feature classes. You can access this information in the Catalog Pane/View by:
- Right-click on a feature class.
- Hover over Data Design.
- Click on Fields.
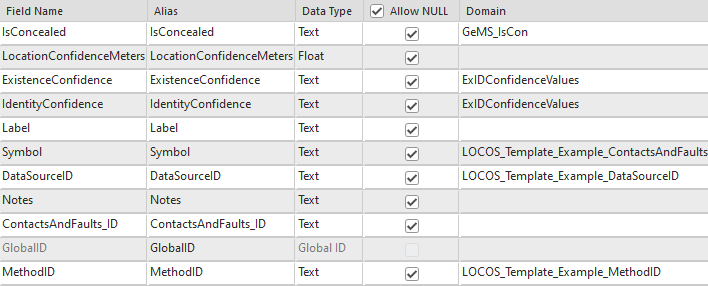
- LOCOS_Template_Example_ContactsAndFaults contains symbols relevant to ContactsAndFaults.
- DataSourceID and MethodID are domain controlled.
- IsConcealed is domain controlled.
- GeMS Standard confidence values are applied to Existence and IdentityConfidence.

- LOCOS_Template_Example_CartographicLines contains a different set of symbols than ContactsAndFaults.
- DataSourceID is controlled by the same domain as ContactsAndFaults.
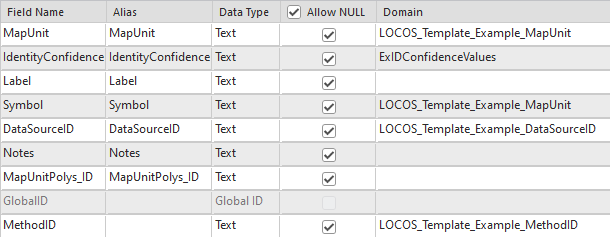
- MapUnit and Symbol are assigned the LOCOS_Template_Example_MapUnit domain.
- Much like the line feature classes, MethodID and DataSourceID are controlled by domains.
- GeMS standard confidence values are applied to IdentityConfidence.
Non-Spatial Tables
Refer to each tab below to see how certain non-spatial tables are prepopulated in the template. You can also open these tables in ArcGIS Pro. The tables match their respective domains.

- DataSources_ID corresponds to the DataSourceID domain codes and descriptions.
- Source and DataSources_ID are completed in the table.
- For other relevant sources (not pictured here), URL is also completed. See GeMS or FGDC-STD-013-2006.

- The MapUnit domain draws from MapUnit, FullName, and Age in this table
Note
In this particular example, Description, ParagraphStyle, and other GeMS required fields in the DMU are left blank for simplicity. The template only requires that MapUnit, FullName, Age, HierarchyKey, Label, and Symbol be completed.

- Method_ID and Method correspond to the MethodID domain code and description, respectively.
The AttrRules_CalcFromSymbol Table
The AttrRules_CalcFromSymbol table helps calculation attribute rules in the database automatically populate certain attributes as you digitize. To see this in action, refer to the Digitize Features section. In general, when a feature is created, with 01.01.01 used as an example, the following happens:
- User digitizes a ContactAndFault with symbol 01.01.01
- Calculation attribute rule looks up 01.01.01 in AttrRules_CalcFromSymbol and finds the corresponding information to populate the new feature:
- Calc Rule sets Type=Contact since Type in this table is Contact
- Calc Rule sets ExistenceConfidence=certain since ExIDConfidence in this table is certain
- Calc rule sets IdentityConfidence=certain since ExIDConfidence in this table is certain
- Calc rule sets IsConcealed=N since IsConcealed in this table is N
The above applies to point and line feature classes. Inclination is also set for vertical and horizontal OrientationPoints to 90 and 0, respectively.
A similar mechanism populates MapUnit and Label for MapUnitPoly/MapUnitLabelPoint and related feature classes, except the DMU is the source table.
Why is Existence and IdentityConfidence shortened to one field in AttrRules_CalcFromSymbol and what if I do not always want both confidence values equal?
The table uses a combined field to streamline the underlying attribute rules. Nonetheless, the toolbox gives the option for a template that:
- always sets Identity and ExistenceConfidence equal, or
- allows you to set Identity and ExistenceConfidence to different values (one certain and one questionable or both questionable) when you select a symbol with Identity or Existence questionable.
The example database in this quick start guide uses the second option. Refer to the Toolbox Tutorial for more information on template options. Regardless of the selected option, AttrRules_CalcFromSymbol will always contain ExIDConfidence, which is certain or questionable, depending on the symbol. Attribute rules in the background control whether a user can set the two values differently for their actual data.
Digitize Features
The zip directory that contained the LOCOS_Template_Example.gdb also contains a layer file, LOCOS_Template_Example.lyrx. Within a map in an ArcGIS Pro project,
add that .lyrx file to follow along with the workflow below.
Note
This workflow will demonstrate the attribute rules and domains in the template database. This example was made with certain template options pre-selected which influences how attribute rules function in the database. Using different options will result in slightly different behavior, refer to the Toolbox Tutorial for more information.
Attribute rules achieve several goals:
- Automatically populate attributes that are tied to a selected Symbol.
- Ensures user populated fields that are required are always filled in.
- If a Symbol is changed, ensures dependent attributes are automatically updated.
- Prevents dependent attributes from being edited without changing Symbol.
Digitize New ContactsAndFaults
Make sure you added the LOCOS_Template_Example.lyrx layer file to a map in an ArcGIS Pro project as mentioned in Digitize Features before proceeding.
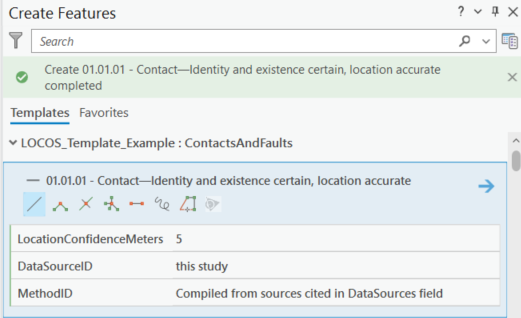
In the Ribbon, click Edit and then click Create Features:
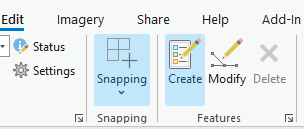
The Create Features Pane opens:
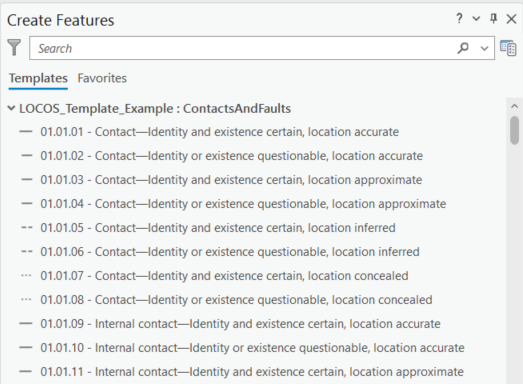
Tip
There are a large number of feature templates since the example database contains extensive domains. Feature Template Favorites provide a method to whittle the list down to feature types you will use frequently.
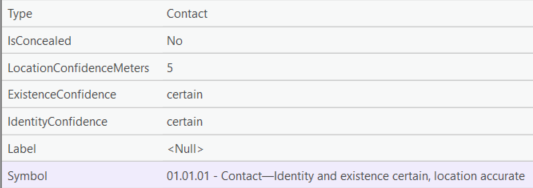
Click on 01.01.01 - Contact—Identity and existence certain, location accurate and note the following attributes appear:
- LocationConfidenceMeters
- DataSourceID
- MethodID
Try digitizing and saving a line while leaving the attributes blank. Note that you receive an error:
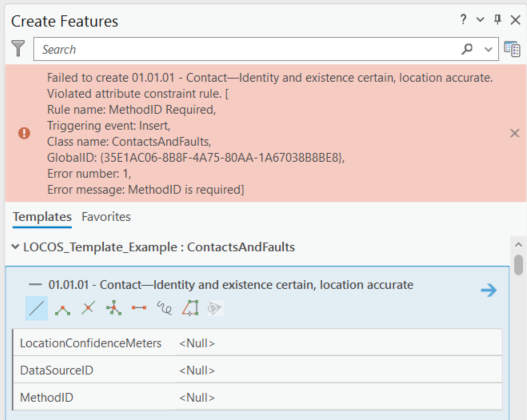
In the screenshot above, the final line in the red box states Error message: MethodID is required. An attribute rule is preventing you from proceeding because MethodID, which is a required attribute, is blank.
To proceed, enter values for LocationConfidenceMeters, DataSourceID, and MethodID and then save the line. Note that this time, the line creates successfully:
In the Ribbon, make sure you still have the Edit tab selected and click Attributes  .
.
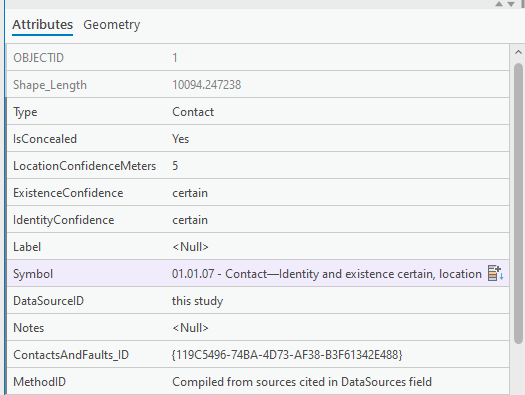
Select your newly created Contact and note the attributes:

The following attributes were automatically populated by attribute rules that looked to the AttrRules_CalcFromSymbol table:
- Type
- IsConcealed
- ExistenceConfidence
- IdentityConfidence
Note
If you open the AttrRules_CalcFromSymbol table and find Symbol 01.01.01, you will notice the attributes specified in the table match the digitized line.
Additionally, ContactsAndFaults_ID was set equal to the GlobalID field (1). If you scroll down to the bottom of the Attributes Pane, you will notice GlobalID shares the same value.
- The GlobalID field is a system generated field that assigns an ID that is unique across any database. It must be part of feature classes that use attribute rules. Template databases also take advantage of them to set GeMS _ID fields.
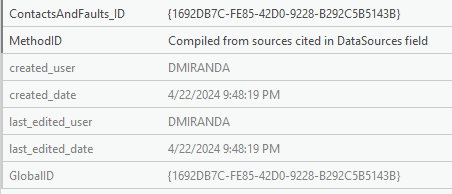
An additional attribute rule in the database sets ContactsAndFaults_ID to GlobalID.(1)
- This is a template option. You can also choose to exclude this rule and set _ID values to something else such as CAF1, CAF2, etc. Refer to Toolbox Tutorial for more information.
Why do I have to manually enter LocationConfidenceMeters?
If you look at the AttrRules_CalcFromSymbol table for 01.01.01 (and all other symbols with LCM), you will notice LCM is always null. When LCM is not set in the AttrRules_CalcFromSymbol table, the user must specify it when they create a feature. Refer to the Toolbox Tutorial for more information on setting LCM to automatically populate.
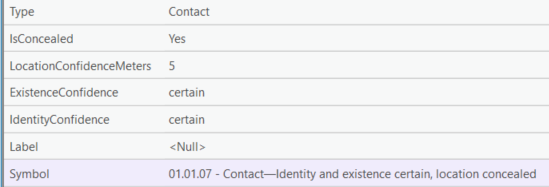
Repeat the above steps with the 01.01.07 - Contact—Identity and existence certain, location concealed feature template.
Look at the attributes and note IsConcealed is Y this time(1).
- In the AttrRules_CalcFromSymbol table, for 01.01.07, IsConcealed is set to
Y.
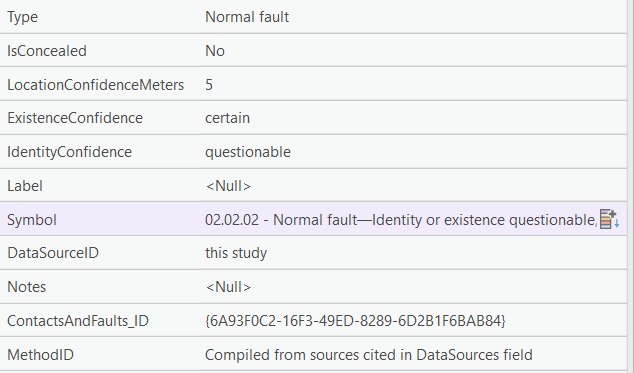
Repeat the above steps with 02.02.02 - Normal fault—Identity or existence questionable, location accurate. However, notice that ExistenceConfidence and IdentityConfidence are now listed.
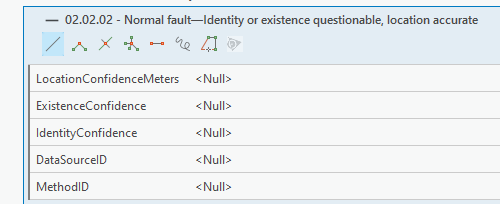
Set ExistenceConfidence to certain and IdentityConfidence to questionable. Set the remaining attributes to any values and digitize a line.
The line creates successfully and the attributes correspond to a questionable normal fault:
Save your changes. Click on the Edit tab on the Ribbon and click Save  .
.
Update Existing ContactsAndFaults
Select your 01.01.01 - Contact—Identity and existence certain, location accurate line.
In the Ribbon, make sure you still have the Edit tab selected and click Attributes .
Change Symbol to 01.01.07 - Contact—Identity and existence certain, location concealed and note that IsConcealed changes from No to Yes.
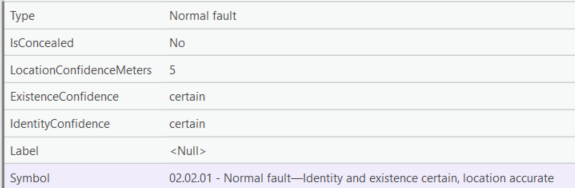
Change Symbol to 02.02.01 - Normal fault—Identity and existence certain, location accurate.
Note that IsConcealed changes to No and Type changes to Normal fault.
Change Symbol to 01.01.02 - Contact—Identity or existence questionable, location accurate. Note that Type updates but you receive an error message:
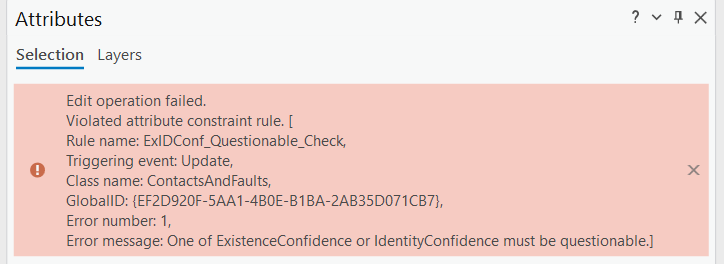
Since you selected a line type where identity or existence could be questionable, at least one of those fields must be questionable. An attribute rule is preventing you from saving the line changes.
Change one of the confidence fields to questionable. This allows you to save the line.
Note
You can also change both confidence fields to questionable. The key is that both cannot be certain.
What if I want Existence and IdentityConfidence to always be equal?
This is controlled by options selected during template database creation. If you choose to have both fields always be equal, then both will
be set to questionable or certain depending on the selected line type. Therefore, these field values never need to be specified.
Refer to the Toolbox Tutorial for more information.
As a final test, attempt to edit the IsConcealed value for your 01.01.02 contact. You will receive the following message:

Digitize MapUnitLabelPoints
From the Create Features Pane, collapse the ContactsAndFaults feature templates by clicking on  . You will see MapUnitLabelPoints listed underneath:
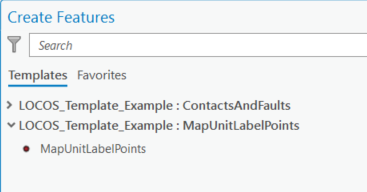
Click on MapUnitLabelPoints. Much like ContactsAndFaults, certain attributes are required and are listed as part of the template.
Try creating a feature while leaving the various attributes blank.
You will receive an error about a required attribute:
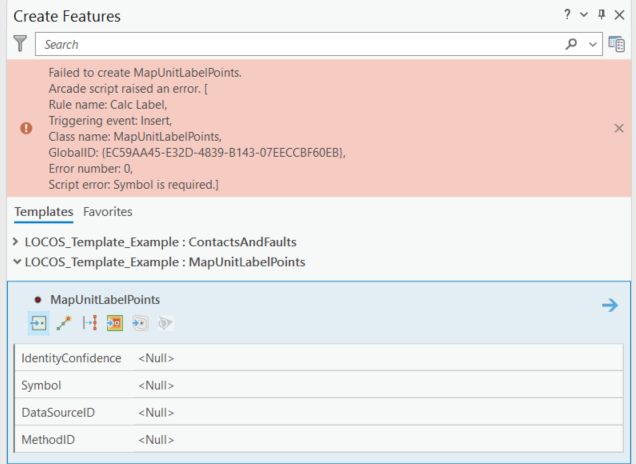
Populate the required attributes and create the point. This time, it creates successfully:
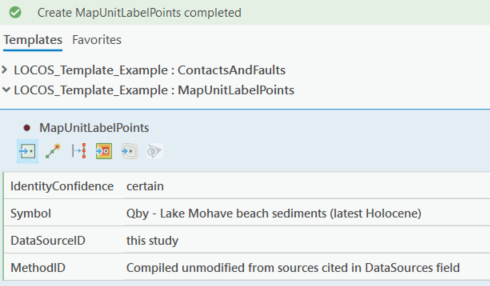
In the Ribbon, make sure you still have the Edit tab selected and click Attributes .
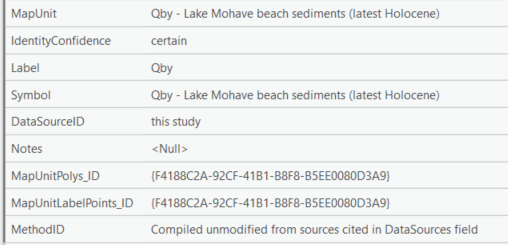
Note the following observations:
- MapUnit was set equal to Symbol, and both use a domain that displays values as
MapUnit - FullName (Age). - Label was set equal to the Label value in the DMU. For the example above, Qby has a Label of Qby(1)
- MapUnitPolys_ID and MapUnitLabelPoints_ID were both set to the GlobalID field.(2)
-
If a MapUnit uses special characters for its age, Label in DMU should reflect this so that it is carried over to digitized MapUnitLabelPoint.
Note
This database does not have MapUnits with special characters.
-
This rule is identical to that applied to ContactsAndFaults. Refer to Digitize New ContactsAndFaults for more information.
Change IdentityConfidence to questionable. Note that Label now ends with a ?.


Note
Just as with ContactsAndFaults, if you update Symbol, MapUnit and Label will be updated to stay in sync.
Conclusions
Through creating new ContactsAndFaults and MapUnitLabelPoints, this tutorial demonstrated attribute rules' capability to:
- Automatically populate dependent attributes.
- Ensure required fields are completed.
By editing existing ContactsAndFaults, attribute rules were able to:
- Keep dependent attributes synced.
- Prevent entry of data that was not consistent.
Finally, use of domains ensured consistent formatting in user driven fields including:
- Symbol
- DataSourceID
- MethodID
Now that you have an understanding of how a template database works, continue onto the next section to install the toolbox that can create templates.