Toolbox Tutorial
This page walks you through generating the example database discussed in the Quick Start Guide. It assumes you are familiar with the example database and have installed the toolbox.
Warning
Do not make any changes to the LOCOS_Template_Domains_TEST.xlsx workbook or any attribute rule csv files while reading through this tutorial.
Toolbox Overview
The Template Geologic Map Toolbox contains a series of individual tools to build and maintain template databases. This tutorial focuses on Create Template GDB for New Database. As the tool title suggests, this tool will generate a template most easily used for new data.
The tool consists of three key pieces:
- The user interface where you specify input parameters such as:
- A database name
- A save location
- Various template options
- A TemplateDomainsTables folder in the toolbox's directory that contains schema spreadsheets which include but are not limited to:
- LOCOS_Template_Domains_TEST.xlsx
- WBR_Template_Domains_Test.xlsx
- An AttributeRule_CSVs folder which contains all possible attribute rules that could be added to a template. The rules actually added depend on the template options you choose.
The schema spreadsheet is the source for many parts of the output database including:
- Feature class specific symbol domains
- The AttrRules_CalcFromSymbol table
- MethodID domain and Method non-spatial table entries
- DataSourceID domain and DataSources non-spatial table entries
- MapUnit domain and DescriptionOfMapUnit non-spatial table entries
- GeMS_IsCon domain
Note
Although there is an ExIDConfidenceValues tab, the spreadsheet has no influence on the ExIDConfidence domain, at least not in the current version of the tool. That domain is controlled entirely by the GeMS toolbox Create New Database tool.
Toolbox Execution Steps
The Create Template GDB for New Database tool starts with a user interface to enter various parameters.
Once the user kicks off the tool, a series of steps are executed that creates a GeMS database and then make additions to convert it to a template. Those steps are depicted graphically below.
graph TD
  ToolStart([User Starts Tool]);
  subgraph GEMS [1. GeMS Toolbox Scripts Run];
  CreateGDB[GeMS Create New Database] -->CreateTop[GeMS Make Topology] -->|User specified location| GEMSDB[(GeMS database)];
  end
  ToolStart ---->|User path to GeMS Toolbox| GEMS;
  subgraph DomainBook [3. Schema Workbook Called];
  sym[\Symbol_Domains Sheet/]-->AttrTable[["`AttrRules_CalcFromSymbol Table and
                                       Symbol Domains`"]]-->et["`Enable AttRules_CalcFromSymbol
                                                               Editor Tracking`"] ~~~ met[\Method Sheet/] -. optional .-> metT[["`Method Table and
                                                                                                                                 MethodID Field/Domain`"]] ~~~ ds[\DataSources Sheet/] --> dst[["`DataSouces Table and
                                                                                                                                                                                          DataSourceID Domain`"]] ~~~ dmu[\DMU_Table/] --> dmut[["`DMU Table and
                                                                                                                                                                                                                                                MapUnit Domain`"]] ~~~ iscon[\GeMS_IsCon Sheet/] --> isconD[[GeMS_IsCon domain]];
  end
  ToolStart -->|User path to Schema Workbook| DomainBook;
  DomainBook --> CAA[Create, Assign, Append] --> TemplateGDB[(Template database)];
  subgraph AttrRules [4. Attribute Rules Folder Accessed/Filtered];
  UniversalRules[\Universal Rule CSVs/] ~~~ OptionalRules[\"`Rule CSVs from
                                                          User Specified Options`"/];
  end
  ToolStart --> AttrRules;
  AttrRules --> Import[Import Rules] --> TemplateGDB;
  GEMS --> schema{{2. Schema Extensions?}} -->|Yes| schemaOptions[Add Extensions] --> TemplateGDB;
  schema -->|No| TemplateGDB;
  TemplateGDB --> edit[5. Enable Editor Tracking] --> ToolEnd([Script Completes]);
Note
This flow chart is for illustrative purposes only. The code itself executes in sequence, as roughly depcited by the numbers in the chart. Some steps are omitted for clarity. For example, enabling GlobalIDs, a requirement for attribute rules, is not specifically shown.
The same steps from the flowchart are described below as an outline:
- The GeMS Create New Database tool create the database. The GeMS Make Topology tool adds a topology class.
- Optional schema extensions, if requested, are included:
- Addition of a MapUnitLabelPoints feature class.
- Addition of surficial unit fields to MapUnitLabelPoints/MapUnitPolys feature classes.
- Generation of domains and tables:
- Creation of AttrRules_CalcFromSymbol table, with editor tracking enabled and Symbol domains.
- Creation of Methods Table, MethodID field, and MethodID domain, if requested
- Appending of records to the DataSources table and creation of DataSourceID domain.
- Appending of records to the DMU table and creation of the MapUnit domain.
- Assigning domains as appropriate
- Importing universal attribute rules and optional rules, if requested, including:
- Setting Existence and IdentityConfidence equal
- Setting GeMS _ID fields to equal GlobalID
- Maintaining surficial unit fields
- Enabling editor tracking
The Template_Domains Workbook
As shown in the Toolbox Execution Steps, the schema Excel workbook drives creation of domains, extra non-spatial tables, and data for existing tables.
In the directory where you saved the toolbox, open the TemplateDomainsTables folder and open the LOCOS_Template_Domains_TEST.xlsx workbook.
This is the schema workbook used to generate the example database discussed in the Quick Start Guide.
Note
The spreadsheet contains domains, data sources, and a description of map units that serve only as an example. They do not represent actual data.
Click on the Symbol_Domains tab. This Excel sheet is converted in its entirety to the AttrRules_CalcFromSymbol table.
Recall from the Quick Start Guide that values in GeMS fields in this table correspond to values automatically set for point/line type when you create/edit features.
The Symbol_Domains tab also creates feature class specific Symbol domains. This is controlled by the first three spreadsheet columns as follows:
graph LR
  st[\Spreadsheet Column/]~~~db[Database Schema]
  Symbol[\Symbol/]-->CV[Coded Value for Symbol Domain]
  Description[\Description/]-->Desc[Description for Coded Value for Symbol Domain]
  GeMSFeatureClass[\GeMSFeatureClass/]-->Domain["Determines which Symbol Domain(s) the Code/Description is/are assigned to"]
Consider the following examples:
| Symbol | Description | GeMSFeatureClass |
|---|---|---|
| 01.01.01 | 01.01.01 - Contact—Identity and existence certain, location accurate | ContactsAndFaults |
| 01.02.01 | 01.02.01 - Key bed—Identity and existence certain, location accurate | MapUnitLines, ContactsAndFaults |
| 06.02 | 06.02 - Inclined bedding | OrientationPoints |
- 01.01.01 is assigned to the Symbol domain for ContactsAndFaults.
- 01.02.01 is assigned to the Symbol domains for both MapUnitLines and ContactsAndFaults.
- 06.02 is assigned to the Symbol domain for OrientationPoints.
The next three tabs control domains and non-spatial tables. Click through the tabs in the workbook while also reviewing the information below:
This Excel sheet is converted in its entirety to the Methods table. This sheet will also set the MethodID domain. The domain is set as follows:
graph LR
  st[\Spreadsheet Column/]~~~db[Database Schema]
  MethodID[\MethodID/]-->CV[Coded Value for MethodID Domain]
  Method[\Method/]-->Desc[Description for Coded Value for MethodID Domain]
The rows in this Excel sheet are appended to the DataSources table in the template database. The domain is set as follows:
graph LR
  st[\Spreadsheet Column/]~~~db[Database Schema]
  DataSources_ID[\DataSources_ID/]-->CV[Coded Value and Coded Value Description for DataSourceID Domain]
Note
The GeMS Create New Database tool already adds the FGDC-STD-013-2006 reference. It is included in the DataSources tab for completeness. However, only one FGDC-STD-013-2006 will reside in the database.
The rows in this Excel sheet are appended to the DescriptionOfMapUnits table in the template database. The domain is set as follows:
graph LR
  st[\Spreadsheet Column/]~~~db[Database Schema]
  MapUnit[\MapUnit/]-->CV[Coded Value for MapUnit Domain]
  MapUnit & FullName[\FullName/] & Age[\Age/]-->Desc["`Description for Coded Value for MapUnit Domain, formatted as
                                                     MapUnit - FullName (Age)`"]
Click on the GeMS_IsCon tab. This tab is converted to the GeMS_IsCon domain in its entirety.
Click on the ExIDConfidenceValues tab. This tab contains the codes and descriptions used in the GeMS ExIDConfidenceValues domain that is added by the GeMS Create New Database tool when Add standard confidence values is checked.
This spreadsheet tab is for reference only and does not affect the template database.
A future version of the tool may allow for customization of the confidence values.
Everything within the schema spreadsheet is customizable. Always make a copy, never update the original workbook. Symbols can be added or removed, assigned to different domains, and the various column values can be edited.
Warning
The toolbox will crash if certain changes are made to the schema spreadsheet. Keep the following in mind:
- Do not delete any sheets in the workbook
- Do not rename or delete any columns within any of the sheets
The AttributeRule_CSVs Folder
The AttributeRule_CSVs folder can be found in the toolbox directory. It contains a series of attribute rule csv files, formatted in such a way
that they are accepted as inputs to the Import Attribute Rules ArcGIS Pro Geoprocessing Tool.
Most are individual rules, though some contain multiple related rules that together are required for the database to work.
For example, CalcCheck_ExIDConfidence_NotEqual.csv contains three rules that together, allow for IdentityConfidence and ExistenceConfidence to be not equal in certain circumstances.
Some rules are universal and are always imported when a template is created.
For example, many of the CalcFromSymbol rules are always imported.
Others depend on options you select when entering tool parameters.
For example, the CalcFromGlobalID rules are only included if you select that template option.
Warning
Deleting or renaming any attribute rule files could cause the toolbox to crash. Editing attribute rule files could lead to unexpected behavior in the database. Do not edit these files.
Running the Toolbox
Set the Schema and Run the Tool
In this section, you will make a small change to the template_domains workbook and then generate a template database that is similar to the database used in the Quick Start Guide.
Save a copy of the LOCOS_Template_Domains_TEST.xlsx and note both the filename and location.
In your copy of the spreadsheet, in the Symbol_Domains sheet, enter a value of 10 for LocationConfidenceMeters for Symbol 01.01.01. The row should look like this:
| Symbol | Description | GeMSFeatureClass | Type | ExIDConfidence | IsConcealed | Inclination | LocationConfidenceMeters |
|---|---|---|---|---|---|---|---|
| 01.01.01 | 01.01.01 - Contact—Identity and existence certain, location accurate | ContactsAndFaults | Contact | certain | N | 10 |
Save and close the spreadsheet.
Warning
The spreadsheet cannot be open while the toolbox runs or it will crash.
Open an ArcGIS Pro Project and add the toolbox to the project. Refer to Adding The Toolbox in ArcGIS Pro for instructions.
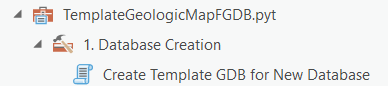
Expand the TemplateGeologicMapFGDC.pyt toolbox and double-click Create Template GDB for New Database.
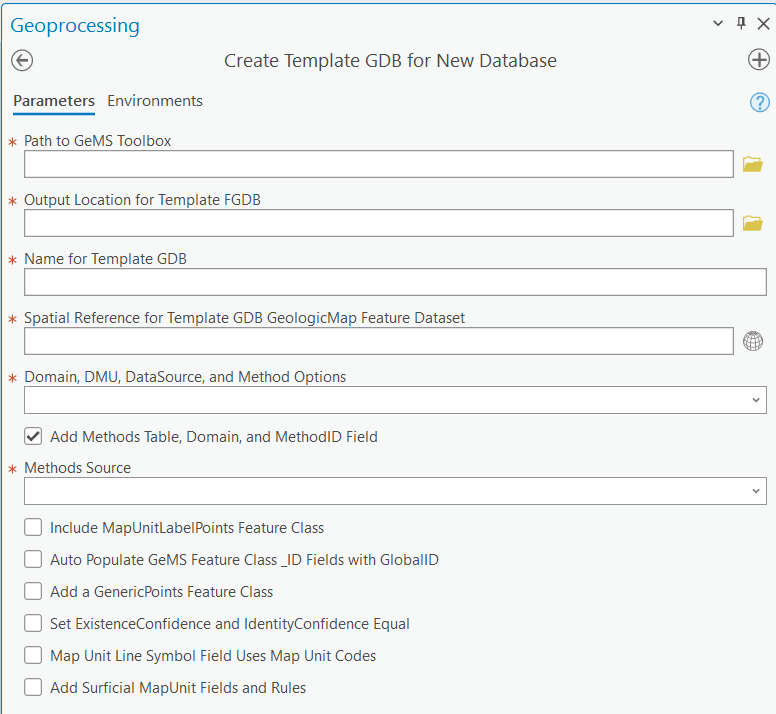
Complete the following toolbox parameters with applicable information(1):
- Path to GeMS Toolbox
- Output Location for Template FGDB
- Name for Template GDB
- Spatial Reference for Template GDB GeologicMap Feature Dataset
- Refer to the parameter tool tips for more information.
For Domain, DMU, DataSource, and Method Options, select Custom Values.
For Path to Schema Excel Workbook, select the copy of the schema workbook that you saved.
For the remaining parameters, have them match the screenshot below:
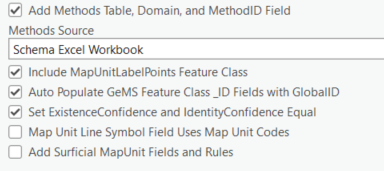
Note
We have made two changes from the database used in the Quick Start Guide:
- Existence and Identity Confidence will now always be equal
- 01.01.01 line types will always have a LocationConfidenceMeters value of 10. All other line types will require you enter a value during feature creation.
Click Run  to start the tool. It will take approximately 4–8 minutes to complete. Status messages will appear in the Geoprocessing Pane.
If you click on
to start the tool. It will take approximately 4–8 minutes to complete. Status messages will appear in the Geoprocessing Pane.
If you click on View Details, you can see all the messages that the tool is outputting.
If you scroll to the top of the messages list, you will see the version of the tool that is running.
This can be helpful for troubleshooting problems.
Digitize Features in the New Database
Add the newly created database to your project. You may need to refresh the directory in Catalog Pane/View before you can see it.
To more easily set up your Pro project for digitizing, we will use the layer file included with the example database used in the Quick Start Guide:
- Within the toolbox directory, navigate to
ExampleTemplates. - Unzip
LOCOS_Template_Example.gdb.zip. - You should now see
LOCOS_Template_Example.lyrx. Add this layer file to your map.
Now, update the Data Source for ContactsAndFaults:
- In the Contents Pane, right-click on
ContactsAndFaultsand selectProperties. - In the Layer Properties pop-up window, click
Source. -
Click
Set Data Sourceand navigate to your newly created template database and select the ContactsAndFaults feature class.
4. Click OK.
You can repeat the above steps for MapUnitLabelPoints, but it is not required for this tutorial.
Note
The feature templates do not reflect the fact that:
- 01.01.01 has a set LocationConfidenceMeters value and does not require user input.
- Existence and IdentityConfidence are always equal and therefore are not user input fields.
If feature templates were set up for this database specifically, those three fields would be hidden.
In the Ribbon, click Edit and then click Create Features:
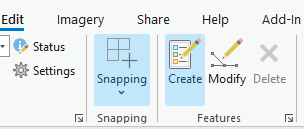
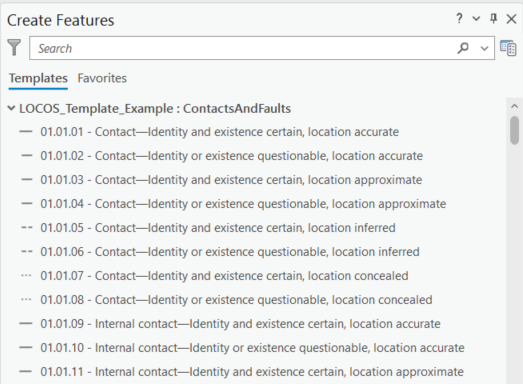
The Create Features Pane opens:
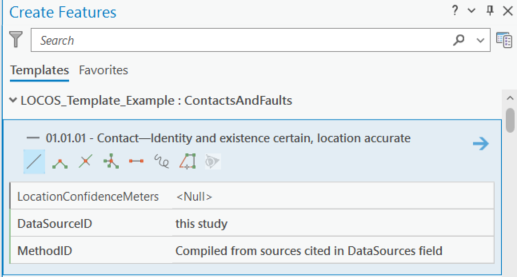
Click on 01.01.01 - Contact—Identity and existence certain, location accurate and note the following attributes appear:
- LocationConfidenceMeters
- DataSourceID
- MethodID
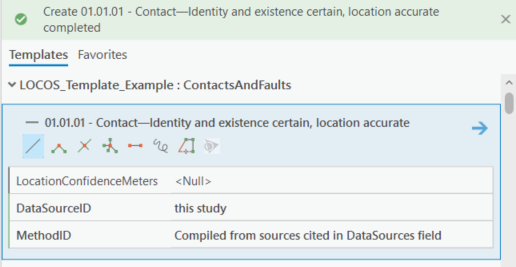
Recall that we set 01.01.01 to have a LocationConfidenceMeters value of 10 by default. Therefore, you can leave this value blank. Enter values for DataSourceID and MethodID then, digitize a new line.
The contact is created successfully.
In the Ribbon, make sure you still have the Edit tab selected and click Attributes  .
.
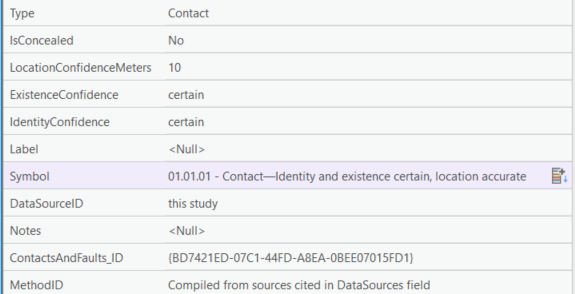
Select your newly created Contact and note the attributes:
- LocationConfidenceMeters equals 10, which is what we set in the AttrRules_CalcFromSymbol table.
- All other attributes populate as expected.
Now, digitize a new line using 01.01.02 - Contact—Identity or existence questionable, location accurate. First, try and create the line with only DataSOurceID and MethodID filled out and try
to save:
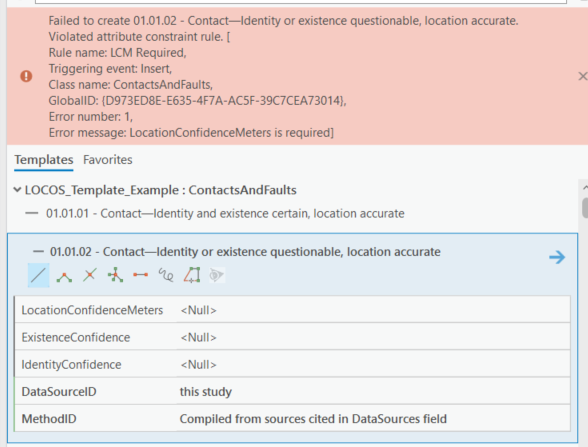
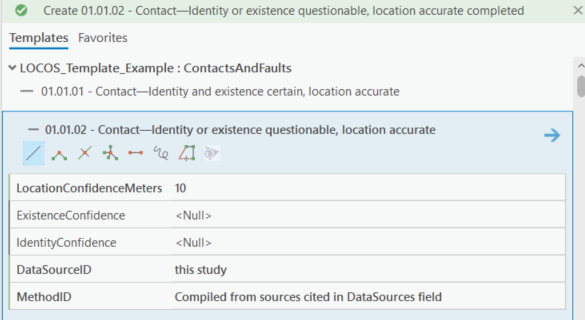
Since we did not specify a LocationConfidenceMeters value in the AttrRules_CalcFromSymbol table for 01.01.02, you have to provide it when creating the feature. This is different than 01.01.01, where we did specify a value in the table. Add a LocationConfidenceMeters value and save the line:
In the Ribbon, make sure you still have the Edit tab selected and click Attributes .
Select your newly created Contact and note the attributes.
- ExistenceConfidence is
questionable. - IdentityConfidence is
questionable.
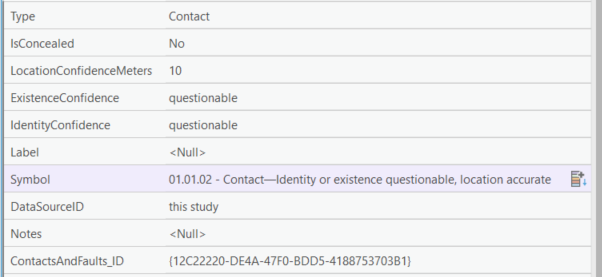
Since we included the template option Set ExistenceConfidence and IdentityConfidence Equal, the attribute rules fully manage this field for us in relevant feature classes. By contrast,
the database in the Quick Start Guide did not use this option and so for questionable contacts, you had to specify the confidence values.